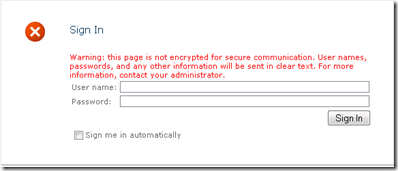
In my Last Post, I talked about creating a Form based authentication web application with Active Directory LDAP. After implementing that you have surely noticed that, when you try to sign in after creating a site collection from FBA web application, you get the following sign in page:
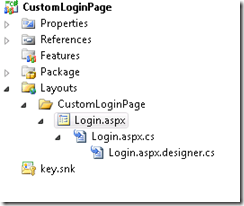
Surely, it does not look pretty at all. So, you might want to change this default login page. In order to do this, first let us create an empty SharePoint project in Visual Studio 2010. After that, add an application page by right click-selecting “Add New Item” and you will get like the following window in Solution Explorer:
Notice that, when you add any application page to your project, Visual Studio automatically creates aLayouts folder. To keep things simple enough for your understanding, you may keep your application page under a folder where you might name it as same as your project like the figure above.
Now, add a reference for Microsoft.SharePoint.IdentityModel in your project. Open the application page, and add an assembly for that on the top of your application page Beofre the Page tag, you should have the following section in your application page:
<%@ Assembly Name="$SharePoint.Project.AssemblyFullName$" %>
<%@ Assembly Name="Microsoft.SharePoint, Version=14.0.0.0, Culture=neutral, PublicKeyToken=71e9bce111e9429c" %>
<%@ Assembly Name="Microsoft.SharePoint.IdentityModel, Version=14.0.0.0, Culture=neutral, PublicKeyToken=71e9bce111e9429c" %>
<%@ Assembly Name="Microsoft.SharePoint, Version=14.0.0.0, Culture=neutral, PublicKeyToken=71e9bce111e9429c" %>
<%@ Assembly Name="Microsoft.SharePoint.IdentityModel, Version=14.0.0.0, Culture=neutral, PublicKeyToken=71e9bce111e9429c" %>
<%@ Import Namespace="Microsoft.SharePoint" %>
<%@ Import Namespace="Microsoft.SharePoint.WebControls" %>
<%@ Import Namespace="Microsoft.SharePoint.WebControls" %>
<%@ Register Tagprefix="SharePoint"
Namespace="Microsoft.SharePoint.WebControls"
Assembly="Microsoft.SharePoint, Version=14.0.0.0, Culture=neutral, PublicKeyToken=71e9bce111e9429c" %>
<%@ Register Tagprefix="asp" Namespace="System.Web.UI"
Assembly="System.Web.Extensions, Version=3.5.0.0, Culture=neutral, PublicKeyToken=31bf3856ad364e35" %>
Now look ContentPlaceHolderID="PlaceHolderMain" and add a literal control and Login Control like the following:
<SharePoint:EncodedLiteral runat="server"
EncodeMethod="HtmlEncode" ID="ClaimsFormsPageMessage"
Visible="false" />
<asp:Login ID="signInControl"FailureText="<%$Resources:wss,login_pageFailureText%>"
runat="server" Width="100%" DisplayRememberMe="true"BackColor="LightCyan" BorderColor="DarkGreen" ForeColor="DarkBlue"InstructionText="Use KFUPM Internet Account to Login"InstructionTextStyle-ForeColor="DarkGreen" InstructionTextStyle-Font-Size="Small" />
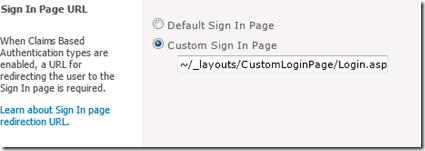
Now, you can obviously customize according to your needs here. That’s it and our custom page is ready to use. So, save and deploy the project. After that, go to central administration->Application Management->Manage Web Application: select your web application for which you have enabled Form based authentication and click on Authentication Providers. Click on Default where a window will pop up and scroll down where you will see a section Sign In Page URL; select Custom Sign In Page and the path will be as the following format:
~/_layouts/ [Project name] / [Application Page Name].aspx
The following is the screenshot for my project:
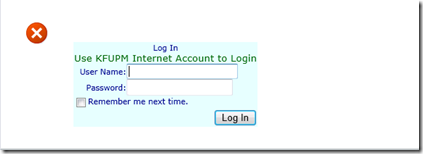
Save it and go to your site collection/site login page which is using this FBA web app. When you will click on Sign In, you should get a page like the following one:
Custom Web Part for signing in Form Based (Claims Based) Web applications:
You have seen until now that how can you create a custom login page for your FBA web application. Now, to improve the functionality like most of the public facing websites, you might want to put this login panel on the home page. Let us now discuss about creating a custom web part which will leverage us this option from home page where you can just add that webpart anywhere you like. So, let us get started.
Open Visual Studio 2010 and create an Empty SharePoint Project. To achieve our goal, we can add a normal web part or a visual web part to our project (Depending on the privilege of having the access to deploy the solution as Farm or Sandboxed). For this instance, I have chosen Farm based solution. So, I have added a Visual Web Part in my project (which is not possible in sandboxed solutions). [In your case, if you do not have sufficient privilege, you can add a normal webpart and create the UI inside theCreateChildControls method of your webpart.]
Now, add the following references to your project:
Microsoft.IdentityModel
Microsoft.IdentityModel.WindowsToeknService
Microsoft.SharePoint.IdentityModel
For visual web part, add the Assembly name inside the .ascx page.
<%@ Assembly Name="Microsoft.SharePoint.IdentityModel, Version=14.0.0.0, Culture=neutral, PublicKeyToken=71e9bce111e9429c" %>
Now, add a login control to this ascx page like below and customize it according to your needs:
<asp:Login runat="server" ID="FBALogin" BackColor="#F7F6F3"
BorderColor="#E6E2D8" BorderPadding="4" BorderStyle="Solid"BorderWidth="1px"
Font-Names="Verdana" Font-Size="0.8em" ForeColor="#333333"Height="201px"
onauthenticate="FBALogin_Authenticate" Width="390px">
<InstructionTextStyle Font-Italic="True" ForeColor="Black" />
<LoginButtonStyle BackColor="#FFFBFF" BorderColor="#CCCCCC"BorderStyle="Solid"
BorderWidth="1px" Font-Names="Verdana" Font-Size="0.8em"ForeColor="#284775" />
<TextBoxStyle Font-Size="0.8em" Width="100px" />
<TitleTextStyle BackColor="#5D7B9D" Font-Bold="True" Font-Size="0.9em"
ForeColor="White" />
</asp:Login>
Notice that, I have added an event handler here FBALogin_Authenticate which will perform the authentication (see the code below)
protected void FBALogin_Authenticate(object sender, AuthenticateEventArgs e)
{
Uri webUri = new Uri(SPContext.Current.Web.Url); //Getting the current context of URL
string membershipProvider = "admembers"; //Set the FBA authentication provider
string roleProvider = "";
e.Authenticated = SPClaimsUtility.AuthenticateFormsUser(
new Uri(SPContext.Current.Web.Url),
FBALogin.UserName,
FBALogin.Password);
if (!e.Authenticated) return;
SecurityToken secTk = SPSecurityContext.SecurityTokenForFormsAuthentication(webUri, membershipProvider, roleProvider, FBALogin.UserName, FBALogin.Password);
if (secTk == null)
{
if (secTk == null)
{
e.Authenticated = false;
return;
}
else
{
return;
}
else
{
SPFederationAuthenticationModule fam = SPFederationAuthenticationModule.Current;
fam.SetPrincipalAndWriteSessionToken(secTk);
e.Authenticated = true;
fam.SetPrincipalAndWriteSessionToken(secTk);
e.Authenticated = true;
SPUtility.Redirect(SPContext.Current.Web.Url, SPRedirectFlags.Trusted, this.Context);
}
}
Adding a Link for Windows Authentication on the Custom Login Web Part:
What if you want to add a link for windows authentication as well if your web application uses both form based and windows based authentication. For this, I have added a link for windows authentication on the web part.
Here below is the OnLoad event for the web part:
protected override void OnLoad(EventArgs e)
{
base.OnLoad(e);
EnsureChildControls();
SPControlMode formMode = SPContext.Current.FormContext.FormMode;
string returnUrl = "/";
{
base.OnLoad(e);
EnsureChildControls();
SPControlMode formMode = SPContext.Current.FormContext.FormMode;
string returnUrl = "/";
if (string.IsNullOrEmpty(
this.Context.Request.QueryString["ReturnUrl"]) == false)
{
returnUrl = this.Context.Request.QueryString["ReturnUrl"];
}
this.Context.Request.QueryString["ReturnUrl"]) == false)
{
returnUrl = this.Context.Request.QueryString["ReturnUrl"];
}
winLoginLink.NavigateUrl =
"/_windows/default.aspx?ReturnUrl="
+ returnUrl;
if (formMode == SPControlMode.Edit || formMode == SPControlMode.New || this.Page.User.Identity.IsAuthenticated == true)
{
DisableLoginForm();
}
"/_windows/default.aspx?ReturnUrl="
+ returnUrl;
if (formMode == SPControlMode.Edit || formMode == SPControlMode.New || this.Page.User.Identity.IsAuthenticated == true)
{
DisableLoginForm();
}
}
In this event, at first, I am checking the mode of the page whether it is new, edit or Logged in mode. We can get the URL for the validated URL from a query string called “ReturnUrl”. Later on, I am setting the navigation URL link for the windows authentication and based on the page mode, hiding the login form which will hide the web part if the current page is in Edit, New or Logged In mode.
private void DisableLoginForm()
{
this.EnsureChildControls();
{
this.EnsureChildControls();
this.FBALogin.Enabled = false;
this.FBALogin.VisibleWhenLoggedIn = false;
this.FBALogin.VisibleWhenLoggedIn = false;
DisableLoginValidator(this.FBALogin, "UserNameRequired");
DisableLoginValidator(this.FBALogin, "PasswordRequired");
winLoginLink.Visible = false;
DisableLoginValidator(this.FBALogin, "PasswordRequired");
winLoginLink.Visible = false;
}
Above code will hide our web part based on the context mode of the page. I will also need to disable the login validator which is provided below:
private static void DisableLoginValidator(
Login loginControl,
string validatorID)
{
Debug.Assert(loginControl != null);
Debug.Assert(string.IsNullOrEmpty(validatorID) == false);
Login loginControl,
string validatorID)
{
Debug.Assert(loginControl != null);
Debug.Assert(string.IsNullOrEmpty(validatorID) == false);
RequiredFieldValidator validator = loginControl.FindControl(
validatorID) as RequiredFieldValidator;
validatorID) as RequiredFieldValidator;
if (validator != null)
{
validator.Enabled = false;
}
}
{
validator.Enabled = false;
}
}
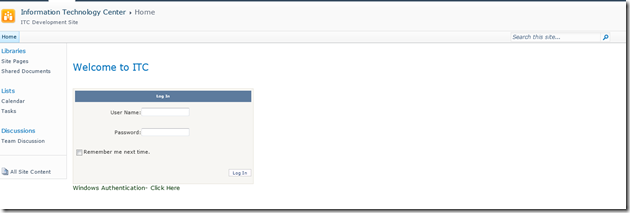
Now, we are ready to go. Deploy it on your target site or site collection where you will use this web part. After adding the web part on the page, it will appear as following screenshot:
How to deal with SharePoint 2010 exception "An exception occurred when trying to issue security token: The server was unable to process the request due to an internal error"
ReplyDeleteScenario:
You receive the below exception when you try to logon to a site that has been configured to use Claims Based Authentication with a custom membership provider using FBA credentials:
Event ID from Event Log - 8306
An exception occurred when trying to issue security token: The server was unable to process the request due to an internal error. For more information about the error, either turn on IncludeExceptionDetailInFaults (either from ServiceBehaviorAttribute or from the configuration behavior) on the server in order to send the exception information back to the client, or turn on tracing as per the Microsoft .NET Framework 3.0 SDK documentation and inspect the server trace logs..
Explanation:
This error started to appear in our QA environment which does not have Visual Studio installed. I have tried starting the service "Claims to Windows Token Service" but that did not help either.
I have made sure that all configuration changes required for FBA have been made properly in the below web.config files:
Web Applications
CA Web Aplication
\14\WebServices\SecurityToken
This post can get you started with building a custom membership provider and making changes to the required configuration files.
Resolution:
To view more information about the actual error that is preventing the secure token service from being able to issue security token, I added the service debug in the web.config for the web service, under \14\WebServices\SecurityToken:
After adding the above to SecurityToken's web.config, the event log reported the below:
An exception occurred when trying to issue security token: The configuration section for Logging cannot be found in the configuration source..
I then realized that it is Microsoft.Practices.EnterpriseLibrary.Logging from my custom membership code that is causing the issues and not FBA configuration as I originally thought.
I then went ahead and added the required configuration for Microsoft.Practices.EnterpriseLibrary.Logging
Everything after that worked as desired. So I strongly advice everyone not to panic and take such drastic steps as re-installing SharePoint 2010 etc.. When I googled for this error, many people suggested to reinstall SharePoint 2010, change server names, etc.. Remember
Can you expound on the solution a bit more? What "configuration" did you do? Point us to a website or something that explains how you got it to work.
Delete