Creating Custom Timer Job in SharePoint 2010

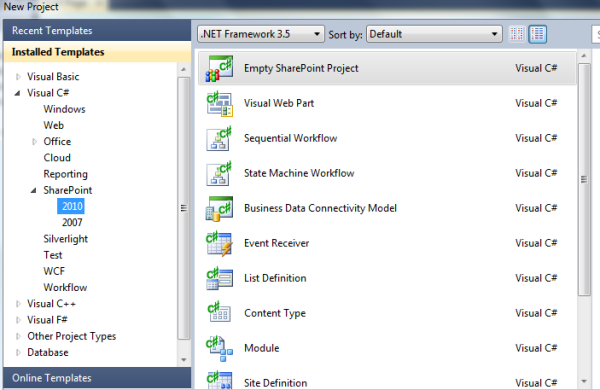
Open Visual Studio 2010 >File > New >Project >SharePoint 2010>Empty SharePoint Project. >Name it Custom_TimerJob>Ok

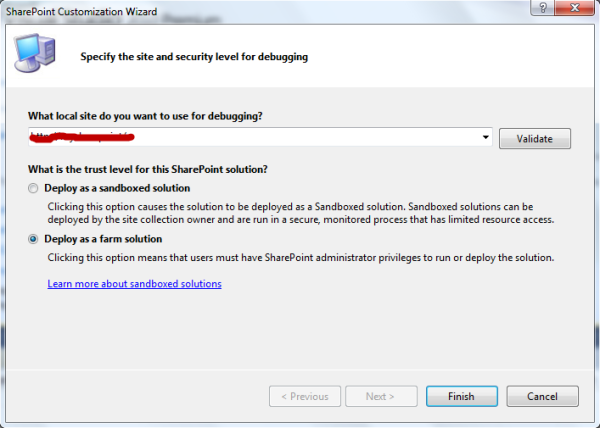
Check Deploy as farm solution>Finish

create a class that inherits from the Microsoft.SharePoint.Administration.SPJobDefinition class. To implement this class, you need to create a few constructors and override the Execute() method as following
01namespace DotnetFinder
02{
03    class ListTimerJob : SPJobDefinition
04    {
05         public ListTimerJob()
06
07            : base()
08        {
09
10        }
11
12        public ListTimerJob(string jobName, SPService service, SPServer server, SPJobLockType targetType)
13
14            : base(jobName, service, server, targetType)
15        {
16
17        }
18
19        public ListTimerJob(string jobName, SPWebApplication webApplication)
20
21            : base(jobName, webApplication, null, SPJobLockType.ContentDatabase)
22        {
23
24            this.Title = "List Timer Job";
25
26        }
27
28        public override void Execute(Guid contentDbId)
29        {
30
31            // get a reference to the current site collection's content database
32
33            SPWebApplication webApplication = this.Parent as SPWebApplication;
34
35            SPContentDatabase contentDb = webApplication.ContentDatabases[contentDbId];
36
37            // get a reference to the "ListTimerJob" list in the RootWeb of the first site collection in the content database
38
39            SPList Listjob = contentDb.Sites[0].RootWeb.Lists["ListTimerJob"];
40
41            // create a new list Item, set the Title to the current day/time, and update the item
42
43            SPListItem newList = Listjob.Items.Add();
44
45            newList["Title"] = DateTime.Now.ToString();
46
47            newList.Update();
48
49        }
50}
51}
As you can see this job just add a new item to a ListTimerJob list every time it’s executed
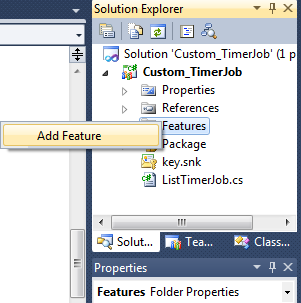
Now that you have the job built> Right click on the Features >Add Feature

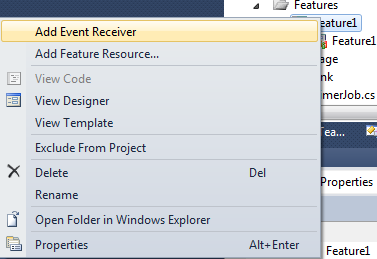
Right click on the Feature1 ” you can rename the Feature1 to any name” > Add Event Receiver

As you can see the event Receiver class inherits from the Microsoft.SharePoint.SPFeatureReceiver and This class handles events raised during feature activation, deactivation, installation, uninstallation, and upgrade. But we only need FeatureActivated & FeatureDeactivated event handler to install/uninstall our custom timer job as following
01namespace DotnetFinder.Features.Feature1
02{
03[Guid("9a724fdb-e423-4232-9626-0cffc53fb74b")]
04public class Feature1EventReceiver : SPFeatureReceiver
05    {
06        const string List_JOB_NAME = "ListLogger";
07        // Uncomment the method below to handle the event raised after a feature has been activated.
08
09        public override void FeatureActivated(SPFeatureReceiverProperties properties)
10        {
11            SPSite site = properties.Feature.Parent as SPSite;
12
13            // make sure the job isn't already registered
14
15            foreach (SPJobDefinition job in site.WebApplication.JobDefinitions)
16            {
17
18                if (job.Name == List_JOB_NAME)
19
20                    job.Delete();
21
22            }
23
24            // install the job
25
26            ListTimerJob listLoggerJob = new ListTimerJob(List_JOB_NAME, site.WebApplication);
27
28            SPMinuteSchedule schedule = new SPMinuteSchedule();
29
30            schedule.BeginSecond = 0;
31
32            schedule.EndSecond = 59;
33
34            schedule.Interval = 5;
35
36            listLoggerJob.Schedule = schedule;
37
38            listLoggerJob.Update();
39
40        }
41
42        // Uncomment the method below to handle the event raised before a feature is deactivated.
43
44        public override void FeatureDeactivating(SPFeatureReceiverProperties properties)
45        {
46            SPSite site = properties.Feature.Parent as SPSite;
47
48            // delete the job
49
50            foreach (SPJobDefinition job in site.WebApplication.JobDefinitions)
51            {
52
53                if (job.Name == List_JOB_NAME)
54
55                    job.Delete();
56
57            }
58
59}
60
61   }
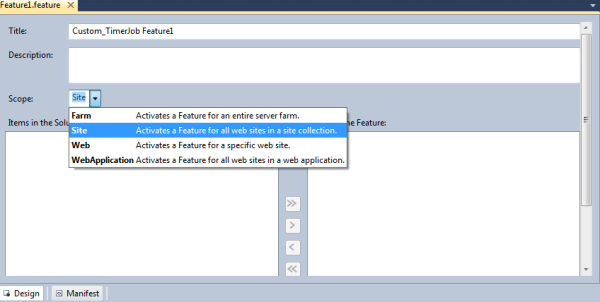
Before Deploying you should select the right scope of the Feature in other words in which scope you will activate the Feature(Farm,Site,Web,WebApplication) in our case we will activate Feature1 on Site which is mean Site Collection.

Note : if you trying to activate the feature in the wrong scope will get the following error

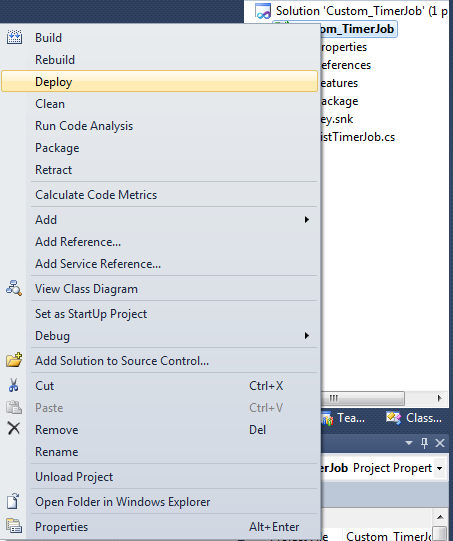
Now let us deploy our custom timer job >Right Click on Custom_TimerJob project > Click Deploy

Open now your SharePoint site and select ListTimerJob List and you should see something similar to the following image


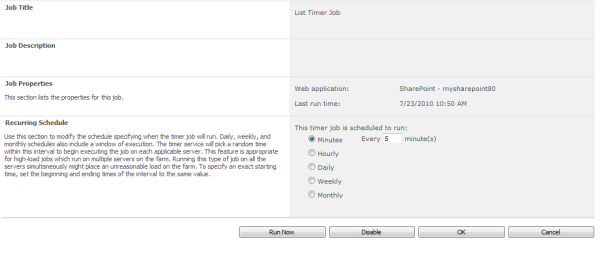
Our custom timer job is working fine now you can go and check it and modify the schedule as following
Go to SharePoint 2010 central administration >Monitoring >in the Timer Jobs Section Select Review Job Definitions
and you should See our Custom Timer Job

Click on it and you should see Edit Timer Job Page ,Modify Timer Job schedule based on your requirement
Note : you can also modify schedule of your custom Timer Job from the code but you need to add one of the following class in FeatureActviated Event Handler as following
Comments

Popular posts from this blog

Migrating from Skype for Business to Microsoft Teams: A Step-by-Step Guide

Do you still use Skype for Business to meet the communication and collaboration needs of your business? If so, now is the perfect time to think about switching to Microsoft Teams, a cutting-edge platform with cutting-edge capabilities and seamless connectivity with other Microsoft services. But if you're unfamiliar with the procedure, switching to a new platform can seem like a difficult task. I'll walk you through the process of switching from Skype for Business to Microsoft Teams in this article. Plan the migration in Step 1 You must make a plan before you start the relocation procedure. Set a deadline, make a list of all the Skype for Business capabilities you presently use, and choose whether to migrate gradually or all at once. Step 2: Set up your surroundings. Make sure your network and infrastructure fulfil Microsoft Teams' standards. Upgrades to your hardware, software, and licences might be necessary. Additionally, confirm that you have the right permissions to ca

How to: Debug SharePoint Applications

You can greatly simplify debugging by using Visual Studio extensions for Windows SharePoint Services. This topic includes procedures that explain the following: Debugging with Visual Studio extensions for Windows SharePoint Services Performing manual debugging Performing remote debugging Debugging with Visual Studio extensions for Windows SharePoint Services Press the F5 key to begin debugging with Visual Studio extensions for Windows SharePoint Services. The following procedure demonstrates how to enable F5 debugging. To enable F5 debugging Locate and open the target SharePoint application's Web.config file. By default, it is located in C:\Inetpub\wwwroot\wss\VirtualDirectories\80. Find the following line of code and change the  debug  attribute to  true . Save the changes to the Web.config file. In Visual Studio, right-click the SharePoint project, and then click  Properties . Click the  Debug  tab, and then type the target SharePoint URL in t

SharePoint 2010 – How to use Audio and Video Webpart

Video and Audio Web Part [ a.k.a Media Web Part ] is one of the new cool web parts in SharePoint 2010, so in this article I am going to show you the way to add this web part in your page. To add Media web part to the page you must activate those two features 1- SharePoint Server Publishing Infrastructure Feature in Site Collection features 2- SharePoint Server Publishing Feature in Site features After that edit page then click on Insert tab in SharePoint Ribbon then select Video and Audio Now the Media Web Part in the page Click on the Media Web Part and you will find Options Tab in the Ribbon As you can see in the Options tab there are Chang Media button allow you to select the video and Chang Image button to change the image of web part and Styles (Dark, Light) Click on Change Media to select the Media file. From Computer opens up the Upload media so you can upload the video and display it. Once you click ok and saving the page. Click on play button and enj